Apple iOS: Installing PAID apps for FREE, when already purchased by a family member

Keep in mind that this quick “how-to” makes the assumption that you’ve already set up family sharing for everyone that is in your family.   If you haven’t yet done so, you’ll first need to set up Family Sharing with these instructions.

Once you’re all set up, then the rest is relatively simple.

First, open up the App Store by finding the icon on your device.

After opening up the App Store, you will see a small round icon at the top, right corner of the screen.   This icon should be your photo, or a letter that represents your name.   Press on this round icon at the top, right.

After you’ve done this, you’ll be presented with a screen that has your name at the top, along with some options below.   You should see an option labeled Purchased directly below where your name is.   Press this option.

Next, provided that you have Family Shared set up and enabled within your family, you will see a list of all of your group or family members.  Depending on who originally purchased the app (or apps) that you want to install, you should press the name that you would like to view the list of purchased applications for.

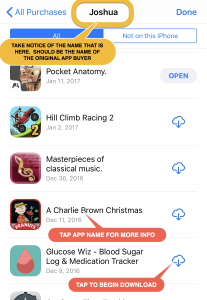
Once you press the name, you’ll be presented with a list of apps that you can download and install 
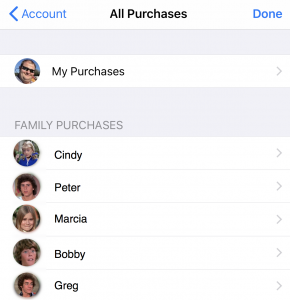
on your device at no charge, because it is shared through the Family Sharing.

Good Luck!   And leave any comments if you have questions or problems with these instructions!

Josh

G Suite (Google Apps) on iOS devices

Many customers that use G Suite (formerly Google Apps) are frustrated when e-mails aren’t delivered as quickly as they are accustomed to when using the built-in Mail client on.  I’ve personally used these settings for a while and share them with others as well.   Note that these settings will not work with Gmail accounts, only with G Suite accounts.

Setting up your Google Apps-based e-mail account using these steps will often allow your mail notifications to come quicker than setting it up via the standard “Gmail” account type when setting up your account.
Follow these steps to get your account set up this way.


  1. First, you need to remove your existing account. 
    – Go to SettingsPasswords & Accounts
    – Find your e-mail address or provider name and press it
    – Select Delete Account from the screen that appears
    – Repeat this for any other instance of your Google Apps e-mail address
  2. Now go back to the main Passwords & Accounts screen, via Settings ➤ Passwords & Accounts
  3. Press Add Account
  4. Select the Exchange option from the list
  5. In the Email area, enter your full e-mail address.  For description, it is suggested to leave it as the default.
  6. Press Next.  If prompted to sign in using Microsoft, be sure to select Configure Manually.
  7. Type your e-mail account password in the given Password box.
     ** Note: If you use two-factor authentication, you may need to generate and use an App Password from your Google account.
  8. Press Next.  If you see an error about an invalid certificate, or a security warning, then click Cancel.
  9. You should now have a screen with additional options.   On this screen, enter the following:
    Email: Your e-mail address (should already be populated)

    Server: m.google.com
    Domain: –Leave Blank–
    Username: Your e-mail address
    Password: Your e-mail password (or the App Password that you generated previously)
    Description: Exchange
  10. Now, press Next
  11. The next screen should have Mail, Contacts, Calendars, and Reminders listed — all of these should be Enabled.
  12. Press Save
  13. You are finished — you should now verify that your Calendar, Contacts, and e-mail are all present within the associated applications.
  14. You may wish to open Settings ➤ Notifications ➤ Mail ➤ Exchange and ensure that Lock Screen, Notification Center, and Banners are all checked.   Also you should be aware of the Banner Style in case it is set to Temporary.
  15. Test your phone’s notifications by sending yourself an e-mail from another device or computer while your phone is asleep.   Be sure not to open the e-mail that you send to yourself, as if it is marked as “read” then it may cause the notification to silence/disappear.


Welcome!

Hello all!  Welcome to my site.  Probably won’t be much here at first, but my plan is to post helpful information that I provide to friends and customers, so it can be easily referenced by others in the future.  Also welcome any comments or feedback on any upcoming posts!     ~Josh