Now, to be fair, I have encountered several similar offerings by various companies over the years, so I will list those at the bottom of this post. And also, to be forthcoming, if you sign up for Privacy via the link that I provide here then we both will receive $5.00 upon your first transaction. Not exactly going to get rich off of it, but might as well get a few extra bucks for my effort!
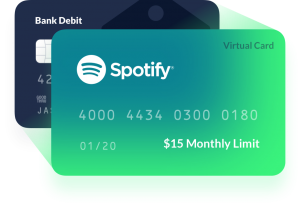
What does Privacy.com do? In short, you get a unique credit card number for every company that you make payments to. These unique card numbers can have limits set (i.e., for Netflix, set the limit to $20 per month). Additionally, the cards are locked to the merchant. So, the Netflix card will never work except for at Netflix — everything else will decline.
The best part of this structure is that if there is a breach at a company with whom you do business (Target, as an example) — then the only card that is affected is the card you’ve labeled as “Target”. You simply cancel that virtual Target card and generate a new one for future shopping at Target. The worst case scenario here, is that the hacker is able to make purchases at Target with your card. They would not be able to use the card anywhere else due to the “merchant lock” that is in place. Since hackers typically “test” the stolen cards at a random place to see if the card is good, it’s very unlikely you would ever have any unauthorized charges.
When a transaction processes via one of your cards, it appears on the Privacy.com dashboard and is soon scheduled to be “settled” via your checking account. This typically takes a couple of days to process. Be sure that you take note of this when budgeting your money. Otherwise, you’ll end up having an overdraft or a failed transfer. Happily I don’t know what happens when a transfer attempt fails (not that I haven’t been close before!)
One of the great benefits of this is that, whereas when using your normal bank card while attempting a transaction online they may place a hold for a large amount and then claim “address incorrect” and keep the hold on your money so you can’t fix it and place another order. Or, if an order is cancelled and the merchant says “The hold will disappear within 24-4,000 hours, don’t worry”. With the Privacy card, your funds aren’t affected in the least when this happens. It does count against your limits until the hold drops off, but generally this won’t be an issue.
Privacy.com functions, in some more detail:
- Links to your United States bank account for the purpose of withdrawing funds
- Withdrawals occur via electronic transfer a few days after any transaction has completed.
- Declined or incomplete transactions (“holds”) do not affect your bank account but do go against any limits that are in place.
- Initial limits are presumably computed by some internal algorithm, based on your bank account usage. There are 7-day limits as well as monthly limits. If you use the service and the limit becomes a problem, they have been very responsive in assisting with increasing the limit upon request.
- Generates credit card numbers
- Credit cards can be designated as One-Time-Use (“burner cards”), or as a reusable card.
- You enter a name for your card, and if it is one of the popular merchants, the card will have a customized design.

- All reusable cards are automatically locked to a merchant upon first use. For example, if you pay ABC Electric Co for your power bill, then in the future any other transactions will decline unless they are initiated by ABC Electric Co.
- You generally create one credit card number for each recurring bill that you pay.
- Cards can have individual limits set on them. You can choose between an Overall limit, Per-Charge limit, Monthly limit, or Yearly limit.
- Cards can be Paused (temporarily disabled such that all transactions will decline), or Deleted (permanently removed)
- Cards will be approved with any address and name that you wish to use. (i.e. privacy!)
- You can view the card transactions (and declines) real-time on the Privacy web site.
- Easily Dispute any charges that you did not authorize — happily I’ve never had to test this function but I’m sure that it runs as smoothly as the rest of the service does. In truth, you’d almost have to be trying to get an unauthorized charge, given all of the safeguards.
- Generates Cash Back
- This is a feature that wasn’t offered in the beginning. Interestingly, I did notice that one of the “perks” offered on one of their job postings was (I think) 5% cash back on purchases via their Privacy.com cards.
- If you sign up and are lucky, you can use this hidden gem that I found to activate the cash back feature on your own account. The link purports to only work for the first 500 respondents so I wouldn’t waste any time! After you’ve signed up, click here to activate the cash back on your account!
- If you’re able to activate the cash back, please take the time to upvote them on Product Hunt which is where the link originated. I’m sure they will appreciate this!
- Pay by Privacy Chrome extension that generates new cards, accesses existing cards, and auto-fills form fields.
This is a huge time-saver for using your Privacy cards while shopping online or paying bills. When you click the toolbar icon, it automatically detects what card you generated or used in the past on the site that you are browsing. Better still, it will fill in all of the details on the web page you are on. The only disappointment here is that it’s only available for Chrome. But it runs very smoothly and well, and you can set it so it doesn’t require you to log in each time for accessing your saved cards. This is a must-have complementary tool for Privacy.com!
- Mobile application for your phone that can quickly generate and access card numbers; available for Android and Apple iOS.
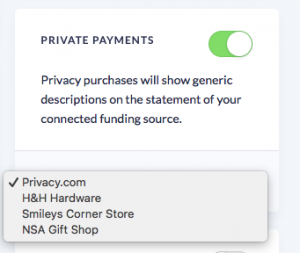
- EDIT (JUNE, 2019) — I forgot to include a feature that I’m particularly fond of! If you are concerned about keeping your purchase history private from your bank, and whomever else that might include, Privacy.com also has a very cool feature that allows you to “mask” the merchant’s name when the charge clears your bank. You have several options, my favorite is the “NSA Gift Shop”. (See the screenshot on the right) Note, that if you don’t enable this feature, then the charge shows on your bank statement with the original merchant’s name, for example, “Privacy.com Netflix”.
I’d also like to be sure to include more about what I’d mentioned earlier — that Privacy is financially sustainable. Now, of course, I’ve not seen their P&L report and can’t be 100% sure that they are doing well, I do know that they make a regular income just by customers using the private card numbers that are generated. To quote their FAQ section on their site, “Every time you spend using Privacy, the merchant or website pays a small fee called interchange. This fee is shared with us.” So, you may have heard the saying “There’s no such thing as a free product. If it’s free, then YOU are the product!” Well, that doesn’t apply here in my opinion because technically it isn’t free. You are giving up the cash back that you might have normally gotten from your bank or credit card, in order to use this service. However, with the addition of the 1-2% cash back they now offer, this is less of an excuse not to use Privacy!
The Bad
I did say that there was some good and bad in the beginning, if you recall. I’d almost forgotten to include “the bad” but to be thorough I feel that I should. The first negative is that if you are accustomed to spending much more via traditional credit cards, but not from your bank account, then they may not provide you with adequate spending limits at first. Even the increases they provide upon request may not be sufficient. This is just something you have to work around in the beginning as they will further increase your limits.
Recently I had a negative experience when I signed a client of mine up for the service in-person. He was a hard sell as it was, as I struggled to explain the benefits. After going through the linking of his bank, and generating the card, I went through the online order process on the site we were ordering from. As it happens, the order included configuring number transfers from one carrier to another for 5 individual lines. This took some time to get set up and validated, then when it came to the point to pay, the card was declined. I logged into Privacy, where I could see the decline and it indicated “Card was paused at the time of the transaction”. Well, no!, it wasn’t! I didn’t pause it! I attempted to generate another card and it failed as well. It turns out that they required additional bank validation in order to avert fraud, so I can understand that. The order was for about $1,000 and probably raised a flag on their end, for a first time transaction. They cleared it up the next day.
The last and final issue is for the online sites that require you to send a “photo” of your physical card in order to add it to your account. Understand that these are few and far between, but that’s an issue I’ve run in to and there is no way around it. I e-mailed Privacy.com’s founder about some ideas I had to work around that, and he forwarded them on to the development team.
Aside from those few issues I’ve encountered, I have nothing but positive feedback for Privacy.com.
COMPETITION AND ALTERNATIVES
Below is the list of active and previous similar products that I’ve been aware of. Technically speaking, the technology is referred to as a Controlled Payment Number. Here’s the list:
Active
- Blur by Abine. I’ve used this personally and it is a very nicely crafted product, which covered overall online privacy. It provides masked phone numbers, e-mail addresses, credit card numbers, and more! Also, the software manages your website passwords as well. This company has been in business for some time, and is very responsive to support inquiries. There is a free version and a paid version. This could be a better fit for you than Privacy.com if you are looking for the additional features.
- Capital One Eno. I’ve used this one personally and it works pretty well. However, I was frustrated by the fact that all of my virtual card numbers stopped working when my physical card number was obtained and fraudulently used. When I cancelled and requested a replacement card, I was unable to use any of my virtual card numbers in the interim while waiting for my replacement card to arrive. Needless to say, I do not use this service from Capital One much anymore. But it is an option and easy to use if you already have a Capital One card.
- Citi Virtual Card Numbers. I’ve used this one as well and it works well, but you have to ensure that your card includes it as a benefit. For whatever reason, I know that Costco-branded Citi cards do not include this benefit, whereas American Airlines AAdvantage cards do. An additional twist on this is that the Costco-branded Citi card will allow you to add an authorized user, and the user has his/her own unique credit card number. The AA Citi card requires authorized users to share the exact same card number. How this makes any sense at all for a company that is supposed to want to eliminate fraudulent use is completely beyond me. The obvious downside is that, with authorized users having identical cards, if one card is skimmed and has to be cancelled, then it affects all cardholders.
Discontinued
- PayPal Virtual Debit Card (discontinued September, 2010)
They offered a very well designed plugin that would generate virtual credit card numbers, automatically fill them on the web site that you were shopping at, as well as save a receipt from the web store after purchase! I was very disappointed when they discontinued this and continued to use it until the plugin began to give me an error. Due to PayPal’s site design, finding older information is hard. But, here is a historical page showing just a basic overview of the product, and here is the discontinuation notice.
- Discover Secure Online Account Numbers (discontinued February, 2014)
I did not use this service, but it allowed you to generate card numbers that were linked to your main account. See historical page here.
- American Express Private Payments (discontinued in 2004)
I did not use this service. Here’s an archived page with an overview.
Thanks for taking the time to read my thoughts on Privacy.com‘s service and other competitors. There are plenty of sections to explore on Privacy.com‘s website if you scroll to the bottom of the page. I hope you will be able to avail yourself of their services so you can see how fulfilling it is to place an online order while maintaining a sense of privacy in the end!
If you have any questions or comments, please feel free to share them!
~Josh
P.S. Stay tuned for an upcoming post about the subject of privacy as it relates to your mobile devices, calls, and messaging services!


 on your device at no charge, because it is shared through the Family Sharing.